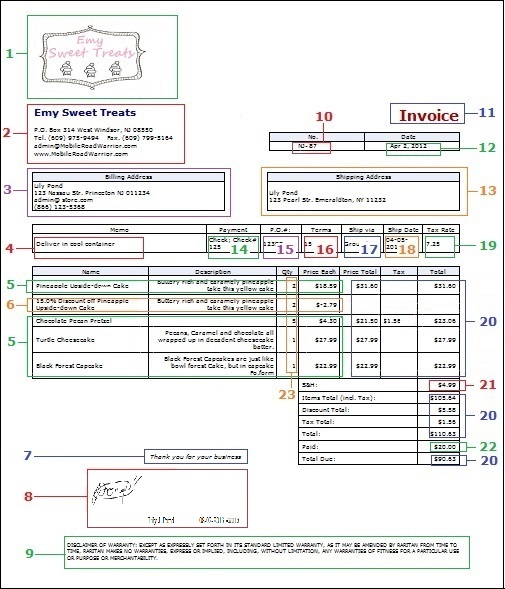
1. Company Logo
Company Logo is optional. You can create a document without logo if you choose to.
If you would like to place your company logo on your documents:
1. You need an image of your company Logo in .PNG, .JPEG or .JPG format.
2. Save this image on your mobile device. You can save it in any place, but we recommend saving it in the /MobileRoadWarrior/ folder so it will be easy to find.
3. Open MRW -> Customize -> My Company tab.
4. Press the "Set Logo" button -> navigate through your device's memory and select he company logo you saved at step 2.
5. You should now see your company logo on the My Company page. If you select the wrong image or decide not to use a logo at all,
please press the "Remove Logo" button. To select a new image, repeat step 4.
6. Press the Back button on your mobile device. You will see a pop-up message that your settings are saved.
2. Company name, address, phone number, etc.
1. Open MRW -> Customize -> My Company tab.
2. Enter company information. All fields that you enter on this page will be shown on your document.
3. Press the Back button on your mobile device. You will see pop-up message that your settings are saved.
3. Client's Name, Billing Address, Phone Number, E-mail address, etc.
You can enter your client's Name, Billing Address, and Phone Number, in 2 different ways:
1. You can define your client in the Client file. BADDR stands for Billing Address, SADDR stands for Shipping Address.
Open MRW -> My Files -> Clients -> press Menu button on your mobile device -> Add Client ->
Enter Name (only mandatory field on this screen), BADDR for Billing Address, and other info like phone number, FAX, web site and other.
Press the back button to save client. When the client added to a invoice or your other document type,
the Billing address will be populated from the Client file which you just entered.
Open MRW -> Invoice -> Full Form -> Client tab -> Click on Clients button right next to Client's name and you will be able to select client from Client list and all recognized fields will be populated automatically.
2. You can enter Client's info and Billing Address when you creating your document (like invoice).
Open MRW -> Invoice -> Full Form -> Client tab -> enter "Addr:" field - this will be the Billing address.
* Client's E-mail address is important! If you will decide to e-mail your client his/her document:
Open MRW -> Invoice -> Full Form -> Final tab -> "Save + Send" button, document with short summary will be send to e-mail address that was
defined at Client's page.
4. Memo
This field can contain any additional "Memo" information you would like to add to your document.
You can enter it when you create your document.
Open MRW -> Invoice -> Full Form -> Start tab -> enter "Memo:" field.
* This field is available in Full Form only.
5. Product/Service Name, Description and Price
You can enter Name, Description and Price in two different ways:
1. You can define Product fields in the Product file. NAME - mandatory field. DESCRIPTION and PRICE are optional fields.
Open MRW -> My Files -> Products -> press Menu button on your mobile device -> Add Product -> Enter Name (only mandatory field on this screen).
While other fields like DESCRIPTION, PRICE, TAX ("y" or "n") are optional you can enter them here and they will
be populated automatically by name when you create the document.
Press the back button to save product. When the product added to the document (like invoice),
Name, Description, Price, Tax will be populated from the Product file which you just entered.
At MRW main menu -> Invoice -> Full Form -> Product tab -> Click the Products button right next to the
Product's name and you will be able to select Product from Product list and all recognized fields will be populated automatically.
2. You can enter the product Name or service Name or Description and Price as well as Quantity, Tax and Discount (if applied) when you creating your document (like invoice).
Open MRW -> Invoice -> Full Form -> Product tab -> enter "Product Name OR Description" field.
Description entered here will be placed in the product Name section of the Invoice, not in the product Description section .
Do not forget to press "+ Add" button to add a product to the product list in the Cart.
* This field is available in Quick and Full Forms.
If you are using the same product over and over again, it will make sense to define it in the Product table(1)
and name it in the invoice page.
If you are using your product or service description differently from client to client, enter it on the invoice page(2).
6. Product Discount
This field can contain a discount as a the "%" of price, or as an amount of currency.
You can enter it ONLY when you create your document in Full Form.
Open MRW -> Invoice -> Full Form -> Product tab -> "Discount:"
Press button "%" to switch between currency and percent. Enter the discount amount.
The Discount will be calculated based on the price of the product and the quantity. If a product is taxable,
tax is calculated on the final price, after the discount is applied.
* This field is available in Full Form only.
7. Thank you for your business
This is part of the standard Mobile Road Warrior invoice. You do not create this greeting.
8. Signature
You have the option to capture a signature under your document, and the name of the person who signing the document.
The signature date is recorded automatically. You can offer your client to enter their his name and sign the screen.
You can choose to ask both your client and your technician to sign the document - in this case, both signatures have to be
placed at the same signing area at the same time, and both names entered above it.
Signing the document is optional, but once a document is signed, you cannot delete the signature.
If you no longer need the document, you can just delete it entirely. The signature will be deleted with the document.
A client's signature is saved on your mobile devise in encrypted format and is assigned to that particular document.
There is no way to re-use a client's signature, re-assign the signature to another document, or to retrieve it from your mobile device to use for any other purpose.
To sign a document: Open MRW -> Invoice -> Quick or Full Form -> Final Tab -> "Signature" button. In the new screen have the client enter his or her name and sign with stylus or finger.
If the signature come out wrong, press "Cancel" and repeat again. If the signature is correct - "Save" it.
If a document is already signed, you will see "Signed" button instead of "Signature". You can press it to review the signature.
* This field is available in Quick and Full Forms.
9. Disclaimer, Terms or Condition notes
This part of the document is optional.
If you would like to place your notes here:
1. Create a plain text document (.txt) with your text:
a) Open Notepad or a similar text editor on your computer
b) Write or cut-and-paste your text.
c) Save it as a ".txt" document. You can name it as you want, but for this example we'll name it notes.txt
2. Save notes.txt on your phone/tablet SD card at any place. We would recommend you to save it to /MobileRoadWarrior/imports/ to keep your data organized.
3. Open MRW -> My Files -> Manage My Files -> Import DB tab -> Import Notes (.txt) button.
10. Document Number
The Document Number consists of the document number itself and of an optional prefix.
The document number is created by MRW app incrementally starting from predefined number, that is by default number 1.
You can overwrite the default starting number with your own document number:
Open MRW -> Customize -> "Next Document #" field - enter your starting document number. Press the back button to save changes.
You may choose to add to the document number a prefix. The prefix is optional and by default is empty.
The prefix could be technician's initials or contain any other meaningful info.
The prefix can be set up in the Customize page only:
Open MRW -> Customize -> in the "Prefix for Document #" field enter prefix value.
The Prefix is visible only on the final document. To preview the document:
Open MRW -> Invoice -> Full Form -> last tab "Final" -> "Preview + Print" button.
* If you are using a Quick Form (MRW -> main menu -> Invoice (your default document type) -> Quick Form),
you can override the Document Number on the form. It is not recommended, but some of our clients found need for it.
11. Document Type.
The Document Type in above example is "Invoice", it is the default document type.
Mobile Road Warrior creates documents in format that you can see above.
By default the document type is "Invoice", but you can change the default document type by choosing type from the predefined option list
or define your own document type:
Open MRW -> Customize -> "Document Type" field: select the document type from the drop-down list of predefined values
or select the very last option "Enter my own value!" and enter your own document type in pop-up window. Press the back button to save changes.
You also can change the document type for the single document:
Open MRW -> Invoice (your default document type) -> Full Form -> first tab "Start" -> select from the drop-down list of document type values.
12. Document Date.
The Document Date created by Mobile Road Warrior app at the time when the document first created. The Document Date located at
Open MRW -> Invoice (your default document type) -> Full Form -> first tab "Start"
In the Full form you can overwrite the document date by clicking on the calendar button next to the date field.
13. Shipping Address.
Client's Shipping Address is optional.
You can enter your client's Shipping Address in two ways:
1. You can define the shipping addresses for client on Client's page, where SADDR stands for Shipping Address.
Open MRW -> My Files -> Clients -> press the Menu button -> Add Client -> Enter client's Name.
Client's name is an only mandatory field on this screen. Enter the client's Shipping Address in the "SADDR" field.
Press back button to save client. When you will select the client from your client list,
the shipping address will be populated from the SADDR field like:
Open MRW -> Invoice (your default document type) -> Full Form -> Client tab -> Click on the Clients button right next to
the Client's name and you select the client from the prompted client list. The Shipping Address (SADDR) as well as other
fields will be populated in the document form automatically.
2. You may choose to enter your client's info at the time you creating document. To enter the Shipping Address:
Open MRW -> Invoice (your default document type) -> Full Form -> Cart tab -> Press the green button with the arrow on the
left top corner of your page -> The Shipping details section will be open. Enter the Shipping Address here.
If you wish to hide the shipping details section, then press the green button with the arrow on the
left top corner of your page.
* The shipping address option available in the Full Form only.
14. Payment
The Payment information consists from two parts: payment method and payment memo.
In example above it is "Check; Check #123" where "Check;" is a payment method and "Check #123" is a payment memo.
Both of those payment fields defined on the same page of Mobile Road Warrior app:
Open MRW -> Invoice (your default document type) -> Full Form -> Payment tab.
The payment method part defined by "Pay by:" field selection.
The payment memo part defined in "Payment Memo:" area.
Warning: Do not enter in "Payment Memo:" area any security sensitive data, like Credit card number.
* Both payment fields are available in Full Form only.
15. P.O. #
Value of the P.O. # coming from "P.O. #" field:
Open MRW -> Invoice (your default document type) -> Full Form -> Start tab -> "P.O. # :" field.
* This fields are available in Full Form only.
16. Terms
Value of the Terms coming from "Terms" field at document screen:
Open MRW -> Invoice (your default document type) -> Full Form -> Start tab -> "Terms:" field.
* This fields are available in Full Form only.
17. Sip Via
In the Ship Via area described shipping method. You can enter the Shipping Method when you creating your document.
Open MRW -> Invoice (your default document type) -> Full Form -> Cart tab -> Press the green button with the arrow on the
left top corner of your page -> The Shipping details section will be open. Enter shipping method in "Via :" field.
If you wish to hide the shipping details section, then press the green button with the arrow on the left top corner of your page.
* The shipping address option available in the Full Form only.
18. Shipping date
The Shipping Date can be entered at:
You can enter Shipping Method when you creating your document (like invoice).
Open MRW -> Invoice (your default document type) -> Full Form -> Cart tab -> Press the green button with the arrow on the
left top corner of your page -> The Shipping details section will be open. Press "Ship Date:" button and select date from pop-up calendar
and press "Set".
If you wish to hide the shipping details section, then press the green button with the arrow on the left top corner of your page.
* The shipping address option available in the Full Form only.
19. Tax Rate
If you are using taxable products, you can enter Tax Rate two different ways: you can set the default Tax Rate value and it will appear the same for all documents,
or you can enter Tax Rate for each document while creating document.
1. To define Tax Rate as default: MRW main menu -> Customize -> Setting tab -> "Tax Rate:" field
If all of your products are taxable, here you also can check "Tax all products:" field and all products in document will be taxable by default.
2. To define Tax Rate when creating document: MRW main menu -> Invoice -> Full or Quick Form -> Cart tab or 4. Review section -> enter "Tax Rate:" and press button "recalculate tax".
If you are travel from place to place with different Tax Rate, use way (2.), otherwise way (1.) will make more sense.
20. Product Total (before tax), Tax Amount, Product Total (including tax), Document Totals.
Those parts of document calculated by Mobile Road Warrior Invoice app based on product info that you entered for the Product when you created your document.
1. Price Total = ( Price for Each product - Discount) X Quantity
2. Tax = Price Total X Tax Rate
3. Total = Price Total + Tax
and also for document totals: Items Total(including Tax), Tax Total, Total and Total Due = Total - Paid
21. S & H (Shipping and Handling price)
The Shipping and Handling price can be entered at:
Open MRW -> Invoice (your default document type) -> Full Form -> Cart tab -> Press the green button with the arrow on the
left top corner of your page -> The Shipping details section will be open. Enter amout into "S+H:" field.
If you wish to hide the shipping details section, then press the green button with the arrow on the left top corner of your page.
* The shipping address option available in the Full Form only.
22. Paid
If your client paid fully or partially his/her bill, you can enter paid amount at
Open MRW -> Invoice (your default document type) -> Full Form -> Payment tab.
Balance will be calculated by Mobile Road Warrior and shown at "Total Due:" field at final document (20.)
Press green down arrow on left top corner to open Shipping detail section.
23. Quantity
If you enter Product, Quantity is mandatory field. By default Quantity equal one.
You can enter Product Quantity: when you creating your document (like invoice).
Open MRW -> Invoice -> Full Form -> Product tab or section -> "Qty:" field.
Do not forget to press "+ Add" button to add product to product list (Cart).


 Quick Gides
 Invoice Anatomy
 Trouble Shooting
  Privacy Policy